Tuesday, June 24, 2014

Create Lookup Site Column using Javascript object model in SharePoint 2013 / 2010

Sometimes we need to create a lookup column as a site column to use it in different list or use it in a content type. Below is a simple code to create a Lookup site column using javascript object model. The code works in both SharePoint 2010 and SharePoint 2013 environment.


 jQuery(function($) {   
        CreateSiteLookupColumn();   
 });   
      var clientContext;  
      var oWebSite;  
      var oList;  
      function CreateSiteLookupColumn()  
      {  
         clientContext= new SP.ClientContext.get_current();   
         oWebSite= clientContext.get_web();  
         //Lookup List  
         oList=oWebSite.get_lists().getByTitle('Countries');  
         clientContext.load(oList);  
         clientContext.load(oWebSite);  
         clientContext.executeQueryAsync(function () {  
                 var fieldXml="<Field Name='Country' DisplayName='Country' Type='Lookup' Required='FALSE' Group='Operations'/>";  
                 var lookupField=oWebSite.get_fields().addFieldAsXml(fieldXml,true,SP.AddFieldOptions.addFieldCheckDisplayName);  
                //Cast to Lookup field to set List Name and lookup column       
                 var fieldLookup = clientContext.castTo(lookupField, SP.FieldLookup);  
                 fieldLookup.set_lookupList(oList.get_id());  
                 fieldLookup.set_lookupField("Title");  
                 fieldLookup.update();              
                 clientContext.executeQueryAsync(function () {   
                         alert('Field Added');   
                      }, function (sender, args) {   
                            alert(args.get_message() + '\n' + args.get_stackTrace());   
                      });   
         },function (sender, args) {   
          alert(args.get_message() + '\n' + args.get_stackTrace());   
      });     
 }  

Friday, June 20, 2014

Get list items using REST in SharePoint 2013

While using REST in SharePoint, the most important thing is to build the URI. The format of URI is discussed in my last post. Now lets work with the URI format to return different results from list.

Lets create a Contacts list with one more additional column DOB of type Date. Add few items in it, the list will look like below.

  • Get all the items from list


 jQuery(function($) {  
       ReadAllItems();  
 });  
 function ReadAllItems()  
 {  
      jQuery.ajax({  
           url:_spPageContextInfo.siteAbsoluteUrl+"/_api/web/lists/getByTitle('Contacts')/items",  
           type:"GET",  
            headers: { "Accept": "application/json; odata=verbose" },  
        success: function (data) {  
           DisplayItems(data);  
     },  
     error: function (err) {  
       alert(JSON.stringify(err));  
     }  
      });  
 }  
 function DisplayItems(data)  
 {  
   var results = data.d.results;  
   var html="<table width='70%'><tr><td>ID</td><td>FirstName</td><td>LastName(Title)</td><td>Company</td><td>DOB</td>"  
   for(var i=0; i<results.length; i++) {  
           html+="<tr>"      
     html+="<td>"+results[i].ID+ "</td>";  
     html+="<td>"+results[i].FirstName+ "</td>";  
     html+="<td>"+results[i].Title+ "</td>";  
     html+="<td>"+results[i].Company+ "</td>";  
     html+="<td>"+results[i].DOB+ "</td>";  
     html+="</tr>"      
   }  
   html+="</table>";  
   $('#divMain').html(html);  
 }  

The result of above code will look like this 


  •  Get All Items with selected columns
Get the columns which are required by using $select 
Replace the url paramter above with the code below

url:_spPageContextInfo.siteAbsoluteUrl+"/_api/web/lists/getByTitle('Contacts')/items"
        +"?$select=Id,FirstName",


  • Order by FirstName ASC
url:_spPageContextInfo.siteAbsoluteUrl+"/_api/web/lists/getByTitle('Contacts')/items"
+"?$select=Id,FirstName,Title,Company,DOB"
+"&$orderby=FirstName",
  • Order by FirstName DESC
url:_spPageContextInfo.siteAbsoluteUrl+"/_api/web/lists/getByTitle('Contacts')/items"
+"?$select=Id,FirstName,Title,Company,DOB"
+"&$orderby=FirstName desc",
  • Get The Top rows
url:_spPageContextInfo.siteAbsoluteUrl+"/_api/web/lists/getByTitle('Contacts')/items"
+"?$select=Id,FirstName,Title,Company,DOB"
+"&$top=2",
  • Filter by Column
url:_spPageContextInfo.siteAbsoluteUrl+"/_api/web/lists/getByTitle('Contacts')/items"
+"?$select=Id,FirstName,Title,Company,DOB"
+"&$filter=FirstName eq 'Akash'",
  • Startswith
url:_spPageContextInfo.siteAbsoluteUrl+"/_api/web/lists/getByTitle('Contacts')/items"
+"?$select=Id,FirstName,Title,Company,DOB"
+"&$filter=startswith(FirstName,'Ak')",

  • Substringof
url:_spPageContextInfo.siteAbsoluteUrl+"/_api/web/lists/getByTitle('Contacts')/items"
+"?$select=Id,FirstName,Title,Company,DOB"
+"&$filter=substringof('k',FirstName)",
  • AND Condition
url:_spPageContextInfo.siteAbsoluteUrl+"/_api/web/lists/getByTitle('Contacts')/items"
+"?$select=Id,FirstName,Title,Company,DOB"
+"&$filter=startswith(FirstName,'A') and Title eq 'Karda'",
  • OR Condition
url:_spPageContextInfo.siteAbsoluteUrl+"/_api/web/lists/getByTitle('Contacts')/items"
+"?$select=Id,FirstName,Title,Company,DOB"
+"&$filter=startswith(FirstName,'N') or Title eq 'Karda'",
    • Date Time Column Filter 
    url:_spPageContextInfo.siteAbsoluteUrl+"/_api/web/lists/getByTitle('Contacts')/items"
    +"?$select=Id,FirstName,Title,Company,DOB"
    +"&$filter=DOB eq '2012-05-17T07:00:00Z'",

    An Introduction : REST in SharePoint 2013

    SharePoint 2013 introduces a Representational State Transfer (REST) service.  You can interact remotely with SharePoint data by using any technology that supports REST web requests. You can now perform Create, Read, Update, and Delete (CRUD) operations for SharePointfrom remote application using REST web technologies and standard Open Data Protocol (OData) syntax. The remote application must be obtain autorized access. Check this MSDN article that covers Authorization and Authentication using ODATA. REST also used Client.svc to perform SharePoint Operations.

    To use REST capabilities, you need contruct the HTTP request using OData standard.

    If you want to do this to an endpoint
    Use this HTTP request
    Read a resource
    GET
    Create or update a resource
    POST
    Use POST to create entities such as lists and sites. The SharePoint 2013 REST service supports sending POSTcommands that include object definitions to endpoints that represent collections.
    For POST operations, any properties that are not required are set to their default values. If you attempt to set a read-only property as part of a POST operation, the service returns an exception.
    Update or insert a resource
    PUT
    Use PUT and MERGE operations to update existing SharePoint objects.
    Any service endpoint that represents an object property set operation supports both PUT requests andMERGE requests.
    ·         For MERGE requests, setting properties is optional; any properties that you do not explicitly set retain their current property.
    ·         For PUT requests, if you do not specify all required properties in object updates, the REST service returns an exception. In addition, any optional properties you do not explicitly set are set to their default properties.
    Delete a resource
    DELETE
    Use the HTTP DELETE command against the specific endpoint URL to delete the SharePoint object represented by that endpoint.
    In the case of recyclable objects, such as lists, files, and list items, this results in a Recycle operation.

    URI structure:


    To access SharePoint resource, you must build the URI endpoint. Check the image for URI syntax


    OData Query operators supported in SharePoint 2013:

    Supported
    Not supported
    Numeric comparisons
       Lt
       Le
       Gt
       Ge
       Eq
       Ne
    Arithmetic operators
    (Add, Sub, Mul, Div, Mod)
    Basic math functions
    (round, floor, ceiling)
    String comparisons
      startsWith
      substringof
      Eq
      Ne
    endsWith
    replace
    substring
    tolower
    toupper
    trim
    concat
    Date and time functions
      day()
      month()
      year()
      hour()
      minute()
      second()
    DateTimeRangesOverlap operator
    Querying as to whether a date time falls inside a recurrent date time pattern

    The figure below shows the supported OData query options.

    In The next few posts, I will perform some basic operation using REST api.

    How to perform operations using Javascript Object Model and SharePoint

    Paging in list items using javascript object model in SharePoint 2013

    Paging can be useful when you want to improve the performance of page. Using javascript object model, you can implement the paging in apps or in any custom page. Below is the example of paging with page size 2 and paging can be perform by Load more button.

    Html code to be added in web page.

     <div id="divMain"></div>  
     <input id="btnMore" type="button" value="Load More" onclick="LoadMore()"></input>  
    

    Javascript code to perform paging using javascipt object model and jQuery


     var context;  
     var oList;  
     var oListItems;  
     var query;  
     jQuery(function($) {  
           var scriptbase = _spPageContextInfo.webServerRelativeUrl + "_layouts/15/";   
          $.getScript(scriptbase + "SP.js", GetListItems);  
     });  
     function GetListItems() {  
       context = SP.ClientContext.get_current();  
       oList = context.get_web().get_lists().getByTitle('Colors');  
       query = new SP.CamlQuery();  
       //Do specify the row limit  
       query.set_viewXml("<View><ViewFields><FieldRef Name='Title'/></ViewFields><RowLimit>2</RowLimit></View>");  
       oListItems = oList.getItems(query);  
       context.load(oListItems);  
       context.executeQueryAsync(onQuerySucceeded,onQueryFailed);  
     }  
     function onQuerySucceeded() {  
       var listEnumerator = oListItems.getEnumerator();  
       var message="";  
       while (listEnumerator.moveNext()) {  
          message+=listEnumerator.get_current().get_item("Title")+"<br/>";  
        }  
        $("#divMain").append(message);  
           var position = oListItems.get_listItemCollectionPosition();  
           if (position == null)  
           {  
                $("#btnMore").hide();  
           }  
     }  
     function onQueryFailed(sender, args) {  
       alert('Error: ' + args.get_message() + '\nStackTrace: ' + args.get_stackTrace());  
     }  
     function LoadMore()  
     {  
           //Get the id of the last item with paging info  
           var position = oListItems.get_listItemCollectionPosition();  
       //If no items present, position will be null  
       if (position != null) {  
         query.set_listItemCollectionPosition(position);  
         oListItems = oList.getItems(query);  
            context.load(oListItems);  
            context.executeQueryAsync(onQuerySucceeded,onQueryFailed);  
       }   
     }  
       
    
    Below is the result of paging with 5 items (page size=2)

    Thursday, June 19, 2014

    Adding Item to list with Managed Metadata Column using Javascript Client Object Model in SharePoint 2013

    On my previous post, I went through how to create term group, term set and terms in SharePoint 2013 using javascript object model. 

    In this post, I will utilize that term set and then will check how to create item which contain Managed metadata Column.

    Create a list will Managed Metadata Column


    To update managed metadata column, you need to get the associate termSet for the column and also get the term Id from that termset.

    Below is the code to add the item with managed metadata column. Read Comments in code for more description.


     jQuery(function($) {  
          var scriptbase = _spPageContextInfo.webServerRelativeUrl + "_layouts/15/";  
          $.getScript(scriptbase + "SP.Runtime.js",  
         function () {  
           $.getScript(scriptbase + "SP.js", function(){  
                $.getScript(scriptbase + "SP.Taxonomy.js", ExecuteTaxonomyFunctions);  
           });  
         }  
       );  
     });  
     function ExecuteTaxonomyFunctions()  
     {  
          var context = SP.ClientContext.get_current();  
          var list = context.get_web().get_lists().getByTitle("Resources");  
        
          var field = list.get_fields().getByInternalNameOrTitle("ResourceType");  
          var txField = context.castTo(field, SP.Taxonomy.TaxonomyField);  
          context.load(field);  
          context.load(txField);  
          //Get the response from server to get the termsetId  
          context.executeQueryAsync(function(){  
            //Get the term set ID  
               var termSetId = txField.get_termSetId().toString();  
               var taxSession = SP.Taxonomy.TaxonomySession.getTaxonomySession(context);  
               var termStore = taxSession.getDefaultSiteCollectionTermStore();  
               var termSet = termStore.getTermSet(termSetId);  
       
               // Get the matching terms based on names  
               var lmi = new SP.Taxonomy.LabelMatchInformation(context);  
               lmi.set_lcid(1033);  
               lmi.set_trimUnavailable(true);  
               lmi.set_termLabel("UI Developer");  
                    
               var termMatches = termSet.getTerms(lmi);  
               context.load(termMatches);  
               //Get the matching term and then add to list item  
               context.executeQueryAsync(function () {  
               if (termMatches && termMatches.get_count() > 0)  
               {  
                   // Get the first matching term. As I know it has only one  
                   // You need to iterate and get the correct term if you have same name terms  
                   var term = termMatches.get_item(0);  
                  
                  // Add Item to list   
                   var itemCreateInfo = new SP.ListItemCreationInformation();  
                   var oListItem = list.addItem(itemCreateInfo);  
                   oListItem.set_item('Title', 'Akash Karda');  
                   var termFieldValue = new SP.Taxonomy.TaxonomyFieldValue();  
                   termFieldValue.set_label(term.get_name());  
                   termFieldValue.set_termGuid(term.get_id().toString());  
                   termFieldValue.set_wssId(-1);  
                   txField.setFieldValueByValue(oListItem, termFieldValue);  
                   oListItem.update();       
       
                   context.executeQueryAsync(function () {  
                     alert('Item Added');  
                    }, function (sender, args) {  
                      alert(args.get_message() + '\n' + args.get_stackTrace());  
                    });  
       
               }  
             }, function (sender, args) {  
                alert(args.get_message() + '\n' + args.get_stackTrace());  
             });  
          },function(sender,args){  
               alert(args.get_message());  
          });  
     }  
       
    
    Item Added to List

    Working with Taxonomy and Javascript object model in SharePoint 2013

    In SharePoint 2010, it was not possible to work with taxonomy types using javascript object model. SharePoint 2013 has introduced a new feature to work with taxonomy by using SP.Taxonomy.js

    Here are some basic operations of taxonomy using javascipt object model.
    1. Create a taxonomy Term Group
    2. Create a taxonomy Term Set
    3. Create taxonomy Terms
    4. Read taxonomy group, termset and terms.


     var groupGuid="cd90a241-2737-48f7-b5a3-43fab9cdc0cb";  
     var termSetGuid="552ae870-07ce-4934-b5c7-c068022a6873";  
     jQuery(function($) {  
          var scriptbase = _spPageContextInfo.webServerRelativeUrl + "_layouts/15/";  
          $.getScript(scriptbase + "SP.Runtime.js",  
         function () {  
           $.getScript(scriptbase + "SP.js", function(){  
                $.getScript(scriptbase + "SP.Taxonomy.js", ExecuteTaxonomyFunctions);  
           });  
         }  
       );  
     });  
     function ExecuteTaxonomyFunctions()  
     {  
          CreateTaxonomyGroup();  
          CreateTermSet();  
          CreateTerms();  
          ReadTerms();  
     }  
     function CreateTaxonomyGroup()  
     {  
          var context = SP.ClientContext.get_current();  
          //Get the taxonomy session object  
       var taxSession = SP.Taxonomy.TaxonomySession.getTaxonomySession(context);  
       //Get the default termstore for the site collection  
       var termStore =taxSession.getDefaultSiteCollectionTermStore();  
          //New group with new guid  
          var newGroup = termStore.createGroup("IT",groupGuid);  
          context.load(newGroup);  
          context.executeQueryAsync(function(){  
                alert("Group Created with Name : "+ newGroup.get_name());  
          },function(sender,args){  
               alert(args.get_message());  
          });  
     }  
     function CreateTermSet()  
     {  
       var context = SP.ClientContext.get_current();  
       //Get the taxonomy session object  
       var taxSession = SP.Taxonomy.TaxonomySession.getTaxonomySession(context);  
       //Get the default termstore for the site collection  
       var termStore =taxSession.getDefaultSiteCollectionTermStore();  
       //Get the term group just created by using GUID  
       var termGroup= termStore.getGroup(groupGuid);  
       //Create a termset with new GUID, 1033 is lcid for US English  
       var termSet= termGroup.createTermSet("Developers", termSetGuid, 1033);  
            context.load(termSet);  
          context.executeQueryAsync(function(){  
                alert("Term Set Created with Name : "+ termSet.get_name());  
          },function(sender,args){  
               alert(args.get_message());  
          });  
     }  
     function CreateTerms()  
     {  
       var context = SP.ClientContext.get_current();  
       //Get the taxonomy session object  
       var taxSession = SP.Taxonomy.TaxonomySession.getTaxonomySession(context);  
       //Get the default termstore for the site collection  
       var termStore =taxSession.getDefaultSiteCollectionTermStore();  
       //Get the term group just created by using GUID  
       var termGroup= termStore.getGroup(groupGuid);  
          //Get the termset by GUID  
          var termSet=termStore.getTermSet(termSetGuid);  
          //Create term with new GUID  
          var term1= termSet.createTerm("Developer", 1033, "1c88007a-b6f0-4175-b91b-ac02f95376d9");  
          var term2= termSet.createTerm("UI Developer", 1033, "676186d9-434e-4998-a050-18043ab66d08");  
           context.load(term1);  
           context.load(term2);  
          context.executeQueryAsync(function(){  
                alert("Term Created with Names : "+ term1.get_name()+ "," + term2.get_name());  
          },function(sender,args){  
               alert(args.get_message());  
          });  
     }  
     function ReadTerms()  
     {  
          var context = SP.ClientContext.get_current();  
          //Get the taxonomy session object  
       var taxSession = SP.Taxonomy.TaxonomySession.getTaxonomySession(context);  
       //Get the default termstore for the site collection  
       var termStore =taxSession.getDefaultSiteCollectionTermStore();  
       //Get the term group just created by using GUID  
       var termGroup= termStore.getGroup(groupGuid);  
          //Get the termset by GUID  
          var termSet=termStore.getTermSet(termSetGuid);  
          var terms= termSet.getAllTerms();  
          context.load(termGroup);  
          context.load(termSet);  
          context.load(terms);  
          context.executeQueryAsync(function(){  
                var result = "Group:"+ termGroup.get_name()+" \n";  
                result+= "Term Set:"+ termSet.get_name()+" \n";  
                var termEnumerator = terms.getEnumerator();  
                result+= "Terms: \n";  
                    while(termEnumerator.moveNext()){  
                         var currentTerm = termEnumerator.get_current();  
                         result+= currentTerm.get_name() + "\n";  
                    }   
           alert(result);  
          },function(sender,args){  
               alert(args.get_message());  
          });  
     }  
    

    Below is the result snapshot of terms created.

    I added a another post which shows you how to add item in list which contain metadata column using javascript object model.

    Tuesday, June 3, 2014

    Quick Launch Accordion with arrow in SharePoint 2013

    Modifying the master page

    • On the head tag of master page html add below lines
    <!--SPM:<SharePoint:ScriptLink Name="~sitecollection/Style Library/jquery.js" runat="server"/>-->
    <!--SPM:<SharePoint:ScriptLink Name="~sitecollection/Style Library/master.js" runat="server"/>-->

    • Add a link to Custom Css in master page.
    • On the head tag of master page html add below highlight lines
    <!--SPM:<SharePoint:CssRegistration Name="Themable/corev15.css" runat="server"/>-->

    <!--SPM:<SharePoint:CssRegistration Name="https://portal.sharepoint.com/Style Library/Master.css" runat="server" After="corev15.css" />-->

    • In your Custom master.css file, add the below CSS classes
    .imgAlign
     {
     padding-right:5px;
     padding-top:5px;
     padding-bottom:3px;

     }

    Modify the javascript file

    • On the master.js file add the below code.

    jQuery(function($){  
      jQuery('.ms-core-listMenu-verticalBox ul.root > li > a').each(function ()  
      {  
         jChildren = jQuery(this).next('ul');  
         if(jChildren.length!=0)  
         {  
            $(this).find("span.menu-item-text").prepend("<img src='/Style Library/PMO/plusArrow.png' border='0' class='imgAlign' />");  
         }  
      });  
      var jChildrens = jQuery('.ms-core-listMenu-verticalBox ul.root ul');  
       //Expand Active Parent node  
       var selectedIndex = -1;  
       for(var i=0; i < jChildrens.length; i++) {  
         jChidlren = jQuery(jChildrens[i]);  
         if(jChidlren.find('li.selected').length > 0) {  
           selectedIndex = i;  
           break;  
         }  
       }  
       jChildrens.hide();  
       if(selectedIndex!=-1)  
       {  
        jChildrens.eq(selectedIndex).parent("li").find("img.imgAlign").attr("src","/Style Library/PMO/minusArrow.png");  
        jChildrens.eq(selectedIndex).slideDown();  
       }  
       //Parents  
       jQuery('.ms-core-listMenu-verticalBox ul.root > li > a').click(function (e) {  
         jChildren = jQuery(this).next('ul');  
         if(jChildren.length!=0)  
         {  
          e.preventDefault();  
          $(this).find("img.imgAlign").attr("src","/Style Library/PMO/plusArrow.png");  
          jChildrens.slideUp();  
          if (jChildren.is(':visible') == false)  
          {  
          $(this).find("img.imgAlign").attr("src","/Style Library/PMO/minusArrow.png");  
            jChildren.slideDown();  
          }  
         }  
       });  
     });  
    

    Arrow Images


    Expanded


    Collapsed:


    Wednesday, May 21, 2014

    Quick Launch Accordion in SharePoint 2013

    Modifying the master page

    • On the head tag of master page html add below lines
    <!--SPM:<SharePoint:ScriptLink Name="~sitecollection/Style Library/jquery.js" runat="server"/>-->
    <!--SPM:<SharePoint:ScriptLink Name="~sitecollection/Style Library/master.js" runat="server"/>-->

    Modify the javascript file

    • On the master.js file add the below code.

     jQuery(function($) {  
     var jChildrens = jQuery('.ms-core-listMenu-verticalBox ul.root ul');  
       //Expand Active Parent node  
       var selectedIndex = -1;  
       for(var i=0; i < jChildrens.length; i++) {  
         jChidlren = jQuery(jChildrens[i]);  
         if(jChidlren.find('li.selected').length > 0) {  
           selectedIndex = i;  
           break;  
         }  
       }  
       jChildrens.hide();  
       if(selectedIndex!=-1)  
       {  
        jChildrens.eq(selectedIndex).slideDown();  
       }  
       //Parents  
       jQuery('.ms-core-listMenu-verticalBox ul.root > li > a').click(function (e) {  
         jChildren = jQuery(this).next('ul');  
         if(jChildren.length!=0)  
         {  
          e.preventDefault();  
          jChildrens.slideUp();  
          if (jChildren.is(':visible') == false)  
          {  
            jChildren.slideDown();  
          }  
         }  
       });
       //Parent Click
       jQuery('.ms-core-listMenu-verticalBox ul.root > li > a > span').click(function (e) {  
         var url = jQuery(this).parent('a').attr("href");  
      window.location=url;
       });    
     });  


    Collapsed:

    Collapse


    Expand:

    Expand


    Friday, May 2, 2014

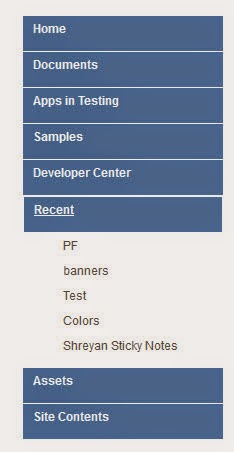
    Quick launch (Left navigation) styles in SharePoint 2013

    Modify the master page

    • Add a link to Custom Css in master page.
    • On the head tag of master page html add below highlight lines
    <!--SPM:<SharePoint:CssRegistration Name="Themable/corev15.css" runat="server"/>-->

    <!--SPM:<SharePoint:CssRegistration Name="https://portal.sharepoint.com/Style Library/Master.css" runat="server" After="corev15.css" />-->

    • In your Custom master.css file, add the below CSS classes

     .ms-core-listMenu-verticalBox UL.root > LI > .menu-item{  
      font-weight:bold;  
      background-color:#5482AB;  
      color:#ffffff;  
      border-bottom-color:#ffffff;  
      border-bottom-style:solid;  
      border-bottom-width:1px;  
      min-height:25px;  
      padding-top:5px;  
      padding-left:10px;  
      font-size:12px;  
      font-family:Arial, Helvetica, Sans-Serif !important;  
     }  
     .ms-core-listMenu-verticalBox > ul.root > li.static > ul.static > li.static > a:hover {  
       color: #ffffff !important;  
       background-color:#D95E00 !important;  
       text-decoration:none;  
     }  
     .ms-core-listMenu-verticalBox > ul.root > li.selected > a {  
        background-image:none;  
        background-color:#D95E00;  
       color:#ffffff !important;  
     }  
     .ms-core-listMenu-verticalBox > ul.root > li > a:hover {  
        background-image:none;  
        background-color:#D95E00;  
       color:#ffffff !important;  
       text-decoration:underline;  
     }  
     .ms-core-listMenu-verticalBox > ul.root > li.static > ul.static > li > a {  
      font-size:12px;  
      padding-left:10px;  
      font-family:Arial, Helvetica, Sans-Serif !important;  
     }  
     .ms-core-listMenu-verticalBox > ul.root > li.static > ul.static > li > a.selected {  
       background:none;  
        color: #D95E00 !important;  
       background-color:#ffffff !important;  
        text-decoration: none;  
        border: 1px #fff solid;  
        font-weight:bold;  
     }  
     .ms-core-listMenu-verticalBox a.selected  
     {  
      border: 1px #fff solid !important;  
     }  
     .ms-core-listMenu-verticalBox UL.root UL  
     {  
      margin:0px 0px 10px 0px !important;  
     }  
    

    Top Navigation Styles in SharePoint 2013

      Modify the master page

      • Add a link to Custom Css in master page.
      • On the head tag of master page html add below highlight lines
      <!--SPM:<SharePoint:CssRegistration Name="Themable/corev15.css" runat="server"/>-->

      <!--SPM:<SharePoint:CssRegistration Name="https://portal.sharepoint.com/Style Library/Master.css" runat="server" After="corev15.css" />-->


      • In your Custom master.css file, add the below CSS classes

       .ms-breadcrumb-top {  
        background-color:#5482AB;  
       }  
       .ms-core-listMenu-horizontalBox {  
       background-color:#5482AB;  
         padding: 0px;  
         margin: 0px;  
         padding-left: 10px;  
         color: #ffffff;  
       }  
       .ms-core-listMenu-horizontalBox li.static {  
        color: #ffffff;  
       }  
       .ms-core-listMenu-horizontalBox li.static a:hover{  
        color: #ffffff !important;  
       }  
       .ms-core-listMenu-horizontalBox li.static > .ms-core-listMenu-item {  
         color: #ffffff;  
          white-space: nowrap;  
          border: 1px solid transparent;  
          padding: 6px 10px;  
          line-height: 20px;  
          height: 20px;  
          font-size: 10pt;  
          font-weight:bold;  
          font-family:Arial, Helvetica, Sans-Serif;  
          margin-right:5px;  
       }  
       .ms-core-listMenu-horizontalBox li.static span.static {  
       }  
       .ms-core-listMenu-horizontalBox li.static > .ms-core-listMenu-item:hover {  
         text-decoration: none;  
          background-color:#D95E00;  
          background-image:none;  
       }  
       .ms-core-listMenu-horizontalBox li.selected a.selected {  
         text-decoration: none;  
          background-color:#D95E00;  
          background-image:none;  
       }  
       ul.dynamic {  
        background-color:#f7f7f7;   
        border:1px solid #b8babd;  
        padding:0px;  
       }  
       ul.dynamic .ms-core-listMenu-item {  
        background-color:#f7f7f7;  
        line-height:20px;  
        font-size: 9pt;   
        font-weight:normal;   
        color:#333;  
        font-family:Arial, Helvetica, Sans-Serif !important;  
        padding:5px;  
       }  
       ul.dynamic .ms-core-listMenu-item:hover {  
          color:#ffffff;  
          background-color:#D95E00;  
       }  
       .ms-listMenu-editLink  
       {  
         display:none !important;  
       }  


      • ms-listMenu-editLink  class is for edit Links button.

      Fixed width master page in SharePoint 2013

      Designing a fixed width site in SharePoint 2013, its very simple. Below steps resolves the issue of Ribbon not appearing on top when editing a long page. The ribbon position is fixed.

      Modifying the master page

      • Open the master page HTML.
      • Add below line just above the div with id ms-designer-ribbon. So the code will look like this
      <div id="mainwrapper" class="mainwrapper" runat="server">

      <div id="ms-designer-ribbon">
      • Add the div closing tag just above the body closing tag
      </div>

      </body>

      • Add the link to custom css and js file in master page
      • On the head tag of master page html add below lines
      <!--SPM:<SharePoint:CssRegistration Name="Themable/corev15.css" runat="server"/>-->

      <!--SPM:<SharePoint:ScriptLink Name="~sitecollection/Style Library/PMO/master.js" runat="server"/>-->

      <!--SPM:<SharePoint:CssRegistration Name="https://portal.sharepoint.com/Style Library/Master.css" runat="server" After="corev15.css" />-->


      Adding the CSS


      • Add the below styles in your master.css file

       body  
       {  
         overflow: auto !important;  
       }  
       .mainwrapper  
       {  
         width: 980px;  
         margin: 0 0;  
         padding: 0;  
         margin-left: auto;  
         margin-right: auto;  
         border-top:none;  
       }  
       body #s4-workspace {  
        overflow: visible !important;  
        position:relative;  
        padding-top:44px;  
       }  
       #ms-designer-ribbon  
       {  
        position:fixed;  
        z-index: 100;  
        width:980px;  
       }  
       body #s4-ribbonrow {  
        position: fixed;  
        z-index: 100;  
        width:980px;  
       }  
       #s4-ribbonrow .ms-MenuUIPopupBody, #s4-ribbonrow .ms-popoutMenu, .ms-cui-menu[id ^= "Ribbon."] {  
        position: fixed !important;  
        background-color:#ffffff;  
       }  
       #s4-mainarea  
       {  
         width: 980px;  
       }  


      Add the Script


      • Add the below javascript in your master.js file
       function FixRibbonAndWorkspaceDimensions() {  
         g_frl = true;  
         var elmRibbon = GetCachedElement("s4-ribbonrow");  
         var elmWorkspace = GetCachedElement("s4-workspace");  
         var elmTitleArea = GetCachedElement("s4-titlerow");  
         var elmBodyTable = GetCachedElement("s4-bodyContainer");  
         if (!elmRibbon || !elmWorkspace || !elmBodyTable) {  
           return;  
         }  
         if (!g_setWidthInited) {  
           var setWidth = true;  
           if (elmWorkspace.className.indexOf("s4-nosetwidth") > -1)  
             setWidth = false;  
           g_setWidth = setWidth;  
           g_setWidthInited = true;  
         }  
         else {  
           var setWidth = g_setWidth;  
         }  
         var baseRibbonHeight = RibbonIsMinimized() ? 55 : 145;  
         var ribbonHeight = baseRibbonHeight + g_wpadderHeight;  
         if (GetCurrentEltStyle(elmRibbon, "visibility") == "hidden") {  
           ribbonHeight = 0;  
         }  
         if (elmRibbon.children.length > 0 && document.getElementsByTagName("html")[0].className.indexOf('ms-dialog-nr') == -1) {  
           elmWorkspace.style.paddingTop = ribbonHeight + 'px';  
         }  
       }  
      
      The result master page will look like this.


      For page with long text, the ribbon is always display at top