Showing posts with label Master Page. Show all posts

Tuesday, June 3, 2014

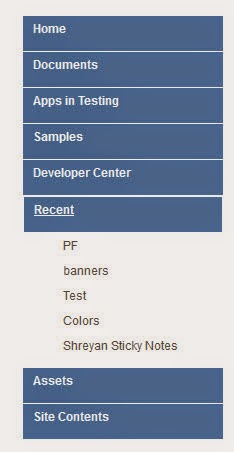
Quick Launch Accordion with arrow in SharePoint 2013

Modifying the master page

  • On the head tag of master page html add below lines
<!--SPM:<SharePoint:ScriptLink Name="~sitecollection/Style Library/jquery.js" runat="server"/>-->
<!--SPM:<SharePoint:ScriptLink Name="~sitecollection/Style Library/master.js" runat="server"/>-->

  • Add a link to Custom Css in master page.
  • On the head tag of master page html add below highlight lines
<!--SPM:<SharePoint:CssRegistration Name="Themable/corev15.css" runat="server"/>-->

<!--SPM:<SharePoint:CssRegistration Name="https://portal.sharepoint.com/Style Library/Master.css" runat="server" After="corev15.css" />-->

  • In your Custom master.css file, add the below CSS classes
.imgAlign
 {
 padding-right:5px;
 padding-top:5px;
 padding-bottom:3px;

 }

Modify the javascript file

  • On the master.js file add the below code.

jQuery(function($){  
  jQuery('.ms-core-listMenu-verticalBox ul.root > li > a').each(function ()  
  {  
     jChildren = jQuery(this).next('ul');  
     if(jChildren.length!=0)  
     {  
        $(this).find("span.menu-item-text").prepend("<img src='/Style Library/PMO/plusArrow.png' border='0' class='imgAlign' />");  
     }  
  });  
  var jChildrens = jQuery('.ms-core-listMenu-verticalBox ul.root ul');  
   //Expand Active Parent node  
   var selectedIndex = -1;  
   for(var i=0; i < jChildrens.length; i++) {  
     jChidlren = jQuery(jChildrens[i]);  
     if(jChidlren.find('li.selected').length > 0) {  
       selectedIndex = i;  
       break;  
     }  
   }  
   jChildrens.hide();  
   if(selectedIndex!=-1)  
   {  
    jChildrens.eq(selectedIndex).parent("li").find("img.imgAlign").attr("src","/Style Library/PMO/minusArrow.png");  
    jChildrens.eq(selectedIndex).slideDown();  
   }  
   //Parents  
   jQuery('.ms-core-listMenu-verticalBox ul.root > li > a').click(function (e) {  
     jChildren = jQuery(this).next('ul');  
     if(jChildren.length!=0)  
     {  
      e.preventDefault();  
      $(this).find("img.imgAlign").attr("src","/Style Library/PMO/plusArrow.png");  
      jChildrens.slideUp();  
      if (jChildren.is(':visible') == false)  
      {  
      $(this).find("img.imgAlign").attr("src","/Style Library/PMO/minusArrow.png");  
        jChildren.slideDown();  
      }  
     }  
   });  
 });  

Arrow Images


Expanded


Collapsed:


Wednesday, May 21, 2014

Quick Launch Accordion in SharePoint 2013

Modifying the master page

  • On the head tag of master page html add below lines
<!--SPM:<SharePoint:ScriptLink Name="~sitecollection/Style Library/jquery.js" runat="server"/>-->
<!--SPM:<SharePoint:ScriptLink Name="~sitecollection/Style Library/master.js" runat="server"/>-->

Modify the javascript file

  • On the master.js file add the below code.

 jQuery(function($) {  
 var jChildrens = jQuery('.ms-core-listMenu-verticalBox ul.root ul');  
   //Expand Active Parent node  
   var selectedIndex = -1;  
   for(var i=0; i < jChildrens.length; i++) {  
     jChidlren = jQuery(jChildrens[i]);  
     if(jChidlren.find('li.selected').length > 0) {  
       selectedIndex = i;  
       break;  
     }  
   }  
   jChildrens.hide();  
   if(selectedIndex!=-1)  
   {  
    jChildrens.eq(selectedIndex).slideDown();  
   }  
   //Parents  
   jQuery('.ms-core-listMenu-verticalBox ul.root > li > a').click(function (e) {  
     jChildren = jQuery(this).next('ul');  
     if(jChildren.length!=0)  
     {  
      e.preventDefault();  
      jChildrens.slideUp();  
      if (jChildren.is(':visible') == false)  
      {  
        jChildren.slideDown();  
      }  
     }  
   });
   //Parent Click
   jQuery('.ms-core-listMenu-verticalBox ul.root > li > a > span').click(function (e) {  
     var url = jQuery(this).parent('a').attr("href");  
  window.location=url;
   });    
 });  


Collapsed:

Collapse


Expand:

Expand


Friday, May 2, 2014

Quick launch (Left navigation) styles in SharePoint 2013

Modify the master page

  • Add a link to Custom Css in master page.
  • On the head tag of master page html add below highlight lines
<!--SPM:<SharePoint:CssRegistration Name="Themable/corev15.css" runat="server"/>-->

<!--SPM:<SharePoint:CssRegistration Name="https://portal.sharepoint.com/Style Library/Master.css" runat="server" After="corev15.css" />-->

  • In your Custom master.css file, add the below CSS classes

 .ms-core-listMenu-verticalBox UL.root > LI > .menu-item{  
  font-weight:bold;  
  background-color:#5482AB;  
  color:#ffffff;  
  border-bottom-color:#ffffff;  
  border-bottom-style:solid;  
  border-bottom-width:1px;  
  min-height:25px;  
  padding-top:5px;  
  padding-left:10px;  
  font-size:12px;  
  font-family:Arial, Helvetica, Sans-Serif !important;  
 }  
 .ms-core-listMenu-verticalBox > ul.root > li.static > ul.static > li.static > a:hover {  
   color: #ffffff !important;  
   background-color:#D95E00 !important;  
   text-decoration:none;  
 }  
 .ms-core-listMenu-verticalBox > ul.root > li.selected > a {  
    background-image:none;  
    background-color:#D95E00;  
   color:#ffffff !important;  
 }  
 .ms-core-listMenu-verticalBox > ul.root > li > a:hover {  
    background-image:none;  
    background-color:#D95E00;  
   color:#ffffff !important;  
   text-decoration:underline;  
 }  
 .ms-core-listMenu-verticalBox > ul.root > li.static > ul.static > li > a {  
  font-size:12px;  
  padding-left:10px;  
  font-family:Arial, Helvetica, Sans-Serif !important;  
 }  
 .ms-core-listMenu-verticalBox > ul.root > li.static > ul.static > li > a.selected {  
   background:none;  
    color: #D95E00 !important;  
   background-color:#ffffff !important;  
    text-decoration: none;  
    border: 1px #fff solid;  
    font-weight:bold;  
 }  
 .ms-core-listMenu-verticalBox a.selected  
 {  
  border: 1px #fff solid !important;  
 }  
 .ms-core-listMenu-verticalBox UL.root UL  
 {  
  margin:0px 0px 10px 0px !important;  
 }  

Top Navigation Styles in SharePoint 2013

    Modify the master page

    • Add a link to Custom Css in master page.
    • On the head tag of master page html add below highlight lines
    <!--SPM:<SharePoint:CssRegistration Name="Themable/corev15.css" runat="server"/>-->

    <!--SPM:<SharePoint:CssRegistration Name="https://portal.sharepoint.com/Style Library/Master.css" runat="server" After="corev15.css" />-->


    • In your Custom master.css file, add the below CSS classes

     .ms-breadcrumb-top {  
      background-color:#5482AB;  
     }  
     .ms-core-listMenu-horizontalBox {  
     background-color:#5482AB;  
       padding: 0px;  
       margin: 0px;  
       padding-left: 10px;  
       color: #ffffff;  
     }  
     .ms-core-listMenu-horizontalBox li.static {  
      color: #ffffff;  
     }  
     .ms-core-listMenu-horizontalBox li.static a:hover{  
      color: #ffffff !important;  
     }  
     .ms-core-listMenu-horizontalBox li.static > .ms-core-listMenu-item {  
       color: #ffffff;  
        white-space: nowrap;  
        border: 1px solid transparent;  
        padding: 6px 10px;  
        line-height: 20px;  
        height: 20px;  
        font-size: 10pt;  
        font-weight:bold;  
        font-family:Arial, Helvetica, Sans-Serif;  
        margin-right:5px;  
     }  
     .ms-core-listMenu-horizontalBox li.static span.static {  
     }  
     .ms-core-listMenu-horizontalBox li.static > .ms-core-listMenu-item:hover {  
       text-decoration: none;  
        background-color:#D95E00;  
        background-image:none;  
     }  
     .ms-core-listMenu-horizontalBox li.selected a.selected {  
       text-decoration: none;  
        background-color:#D95E00;  
        background-image:none;  
     }  
     ul.dynamic {  
      background-color:#f7f7f7;   
      border:1px solid #b8babd;  
      padding:0px;  
     }  
     ul.dynamic .ms-core-listMenu-item {  
      background-color:#f7f7f7;  
      line-height:20px;  
      font-size: 9pt;   
      font-weight:normal;   
      color:#333;  
      font-family:Arial, Helvetica, Sans-Serif !important;  
      padding:5px;  
     }  
     ul.dynamic .ms-core-listMenu-item:hover {  
        color:#ffffff;  
        background-color:#D95E00;  
     }  
     .ms-listMenu-editLink  
     {  
       display:none !important;  
     }  


    • ms-listMenu-editLink  class is for edit Links button.

    Fixed width master page in SharePoint 2013

    Designing a fixed width site in SharePoint 2013, its very simple. Below steps resolves the issue of Ribbon not appearing on top when editing a long page. The ribbon position is fixed.

    Modifying the master page

    • Open the master page HTML.
    • Add below line just above the div with id ms-designer-ribbon. So the code will look like this
    <div id="mainwrapper" class="mainwrapper" runat="server">

    <div id="ms-designer-ribbon">
    • Add the div closing tag just above the body closing tag
    </div>

    </body>

    • Add the link to custom css and js file in master page
    • On the head tag of master page html add below lines
    <!--SPM:<SharePoint:CssRegistration Name="Themable/corev15.css" runat="server"/>-->

    <!--SPM:<SharePoint:ScriptLink Name="~sitecollection/Style Library/PMO/master.js" runat="server"/>-->

    <!--SPM:<SharePoint:CssRegistration Name="https://portal.sharepoint.com/Style Library/Master.css" runat="server" After="corev15.css" />-->


    Adding the CSS


    • Add the below styles in your master.css file

     body  
     {  
       overflow: auto !important;  
     }  
     .mainwrapper  
     {  
       width: 980px;  
       margin: 0 0;  
       padding: 0;  
       margin-left: auto;  
       margin-right: auto;  
       border-top:none;  
     }  
     body #s4-workspace {  
      overflow: visible !important;  
      position:relative;  
      padding-top:44px;  
     }  
     #ms-designer-ribbon  
     {  
      position:fixed;  
      z-index: 100;  
      width:980px;  
     }  
     body #s4-ribbonrow {  
      position: fixed;  
      z-index: 100;  
      width:980px;  
     }  
     #s4-ribbonrow .ms-MenuUIPopupBody, #s4-ribbonrow .ms-popoutMenu, .ms-cui-menu[id ^= "Ribbon."] {  
      position: fixed !important;  
      background-color:#ffffff;  
     }  
     #s4-mainarea  
     {  
       width: 980px;  
     }  


    Add the Script


    • Add the below javascript in your master.js file
     function FixRibbonAndWorkspaceDimensions() {  
       g_frl = true;  
       var elmRibbon = GetCachedElement("s4-ribbonrow");  
       var elmWorkspace = GetCachedElement("s4-workspace");  
       var elmTitleArea = GetCachedElement("s4-titlerow");  
       var elmBodyTable = GetCachedElement("s4-bodyContainer");  
       if (!elmRibbon || !elmWorkspace || !elmBodyTable) {  
         return;  
       }  
       if (!g_setWidthInited) {  
         var setWidth = true;  
         if (elmWorkspace.className.indexOf("s4-nosetwidth") > -1)  
           setWidth = false;  
         g_setWidth = setWidth;  
         g_setWidthInited = true;  
       }  
       else {  
         var setWidth = g_setWidth;  
       }  
       var baseRibbonHeight = RibbonIsMinimized() ? 55 : 145;  
       var ribbonHeight = baseRibbonHeight + g_wpadderHeight;  
       if (GetCurrentEltStyle(elmRibbon, "visibility") == "hidden") {  
         ribbonHeight = 0;  
       }  
       if (elmRibbon.children.length > 0 && document.getElementsByTagName("html")[0].className.indexOf('ms-dialog-nr') == -1) {  
         elmWorkspace.style.paddingTop = ribbonHeight + 'px';  
       }  
     }  
    
    The result master page will look like this.


    For page with long text, the ribbon is always display at top